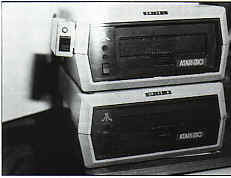
An 810 drive
modification
Some owners of the 810 Disk Drive may
not know that you can use the reverse side of a single-sided disk simply
by cutting a notch on the side of the disk opposite to the existing
notch. It is quite easy to do but it is fiddly and can be dangerous,
especially if, like me, you use a scalpel! In the States a
'Nibble-Notch' is available but costs around $19 for overseas shipment
which is a bit expensive for a ticket collectors punch! An alternative,
which does much more than just allow you to write to the reverse of a
disk, is the Autotect Disk Modification from Magical Electronic
Services.

The Autotect package.
The Autotect consists of a plug in
circuit board, a switch box with LED, a few cable ties and a four page
set of instructions for fitting and use. As well as being able to write
to the reverse of a disk without cutting a notch, you can, depending on
how you connect the board, have automatic write-protect without using
write-protect labels and there is also a switch that enables the drive
to be quietened down. One of the fears about using a device which
ignores write-protect labels is that you may inadvertently delete a
wanted file but the Autotect overcomes this problem by having a
constantly flashing red LED when write-protect is off. You can still
write over a file but your eyesight would have to be pretty poor not to
notice that LED!
Two configurations are possible
depending on how you connect the board. Firstly, with the LED on red you
can write to any disk with or without a notch or write protect label
and, with the LED on green, all disks are write-protected. The
alternative is to have the drive act as normal, i.e. as if it had not
been modified, when the LED is green and have the write enable facility
on all disks when the LED is flashing red. I prefer the latter as I find
it easier to stick a write protect notch on those disks I know I want to
protect but occasionally I want to add something to those disks and I
can then simply flick the switch and add the file or write onto the
other side of the disk. Either way, the choice is yours and the
instructions are quite explicit
on
the correct way to connect up the Autotect for each operation.
The board has a switch which can be
set to one of three positions to quieten down the noise of the drive
when the drive head moves across tracks. Three positions are giver as
the drive may not function correctly with this facility. It certainly
does quieten the drive but I found that even in the `less quiet'
position my drive just kept on spinning forever. It may work on other
drives but I don't really consider this feature to be particularly
important anyway and I have just left mine in the 'off' position.
The switch box and LED fits on to the
outside of the drive and looks very neat, being the same colour as the
drive and slightly larger than a matchbox. Having a look inside the box
reveals a simple rocker switch and LED and, if you don't mind drilling a
few holes, these could easily be removed and fitted to the front panel
of the drive
with the
switch where the Atari logo is and the LED beside the busy light. The
unit nevertheless looks good stuck on the outside, much better in fact
than you might think.

Fitted and looking quite
neat
The instructions are quite clear
except on one point and fitting the unit is relatively easy with no
experience or tools required other than a screwdriver to remove the
drive lid. The exception referred to is in fitting the connector from
the switch where the instructions say that 'the black side of the plug
should be facing up'. In fact mine had no black side and a piece of
intelligent guesswork was required.
I have now been using the Autotect
for several weeks and quite simply would not want to be without it
Definitely one of the best additions to my system and highly
recommended.
top